
Whalen 3-in-1 TV Stand Assembly Instructions: A Comprehensive Plan
This detailed guide provides step-by-step instructions for assembling your Whalen 3-in-1 TV stand, offering three versatile configurations for optimal display options․
Welcome! The Whalen 3-in-1 TV Stand is a remarkably versatile piece of furniture designed to accommodate a variety of entertainment setups and spatial requirements․ This stand isn’t just a single design; it’s a patented system offering three distinct configurations: a standard TV stand, a sleek floating shelf console, and a modern tabletop console․
This flexibility allows you to adapt the stand to your evolving needs and preferences․ Whether you’re aiming for a traditional media center look, a minimalist floating display, or a contemporary tabletop arrangement, the Whalen 3-in-1 delivers․ The included manual, available online in PDF format, will guide you through each configuration, ensuring a smooth and successful assembly process․ Remember to carefully review all instructions before beginning, and consider having a second person assist with certain steps for ease and safety․
Unboxing and Parts Inventory
Carefully unpack all components from the shipping carton․ It’s crucial to protect your work surface during unboxing to prevent scratches or damage to the parts․ Once unpacked, meticulously compare the physical parts against the parts list included in the manual – readily available online as a downloadable PDF;
This inventory process is vital to ensure all necessary pieces are present before you begin assembly․ Pay close attention to identifying each component, including the side panels, base, top panel, center support, spine assembly, and all associated hardware (screws, bolts, washers)․ Note any missing or damaged parts immediately and contact customer support for replacements․ A thorough inventory now will save you significant time and frustration later in the assembly process․ Keep the packaging material until assembly is complete․
Safety Precautions During Assembly
Prioritize safety throughout the entire assembly process․ It is recommended that assembly be performed by two adults, particularly for lifting and aligning heavier components․ Always work in a well-lit and spacious area, free from obstructions․ Wear appropriate safety glasses to protect your eyes from dust and potential flying debris․
Be mindful of pinch points when connecting panels and securing hardware․ Avoid over-tightening screws and bolts, as this can strip threads or damage the particleboard․ If wall mounting is desired, ensure the wall is structurally sound and capable of supporting the combined weight of the TV stand and television․ Consult a professional if unsure about wall mounting procedures․ Keep small parts away from children and pets to prevent choking hazards․ Read all instructions before beginning․

Tools Required for Assembly
Successful assembly of your Whalen 3-in-1 TV stand requires a few essential tools․ A Phillips head screwdriver is absolutely necessary for securing the majority of screws․ A flathead screwdriver may be needed for certain adjustments or minor tasks․ A rubber mallet can be incredibly helpful for gently tapping panels into place without causing damage․
While not strictly required, a power drill with a clutch setting can significantly speed up the process, but exercise caution to avoid over-tightening․ A level is crucial for ensuring the stand is stable and doesn’t wobble․ A measuring tape will assist with verifying component placement․ For wall mounting (optional), you’ll need a stud finder, drill bits appropriate for your wall type, and potentially a level appropriate for wall mounting․

Assembly Configurations
The Whalen stand uniquely offers three distinct setups: a standard TV stand, a sleek floating shelf console, and a versatile tabletop console configuration․
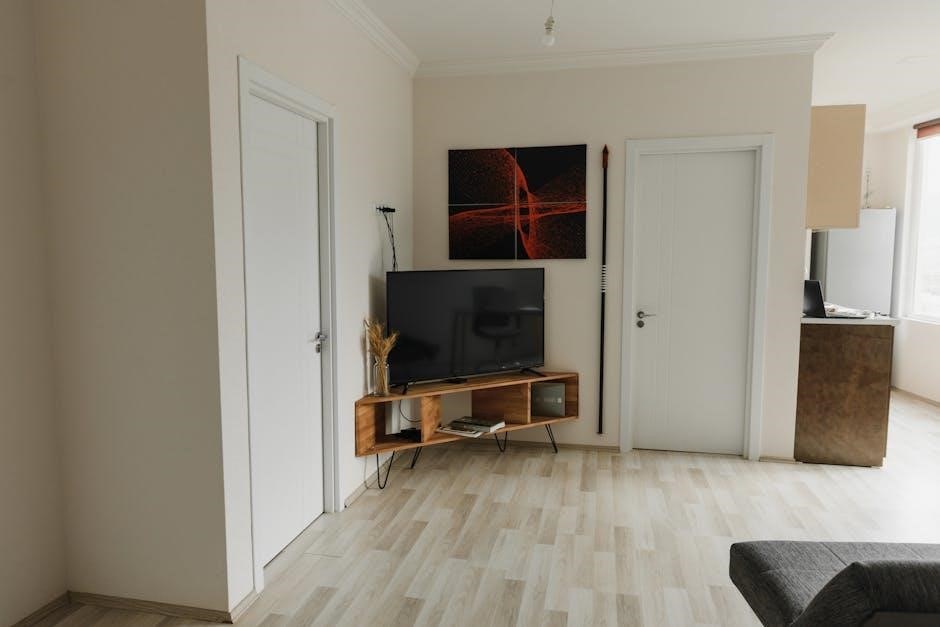
Configuration 1: Standard TV Stand Assembly
For the classic television setup, begin by attaching the side panels securely to the base, ensuring proper alignment before tightening all screws․ Next, install the center support to reinforce the structure and provide stability for your television․ Carefully position and secure the top panel, creating a solid surface for display․
Following this, attach the back panel to enclose the unit and enhance its finished appearance․ This configuration is ideal for those seeking a traditional and robust TV stand․ Remember to consult the included diagrams for visual guidance throughout the process․ Double-check all connections for tightness and stability before placing your television on the assembled stand․ This ensures a safe and enjoyable viewing experience․
Configuration 2: Floating Shelf Console Assembly
To achieve a modern, minimalist look, transition to the floating shelf console configuration; Begin by removing the upper spine assembly – carefully unscrew the bolts and washers securing it to the main spine․ This allows for a streamlined tabletop surface․ Ensure you retain these fasteners for potential future reconfigurations․
With the upper spine removed, the unit transforms into an open console, perfect for displaying media components and decorative items․ This setup offers a clean aesthetic and maximizes space; Prioritize stability by ensuring the base is firmly secured․ This configuration is ideal for smaller spaces or those preferring a less enclosed appearance․ Refer to the manual’s diagrams for precise component removal and placement guidance․
Configuration 3: Tabletop Console Assembly
For a unique display option, convert the Whalen stand into a tabletop console․ This begins with detaching the upper spine, similar to the floating shelf setup – locate and remove the securing bolts and washers from the spine assembly’s rear․ Retain all hardware for potential future adjustments․
Once removed, the remaining structure functions as a standalone tabletop console, ideal for smaller televisions or as a stylish media hub․ This configuration offers versatility and a distinct aesthetic․ Ensure the base remains stable and level․ This setup is particularly suited for bedrooms or secondary living areas․ Consult the provided diagrams within the manual to confirm correct component removal and arrangement for optimal stability and appearance․

Detailed Assembly Steps ⸺ Standard Configuration
Begin by carefully attaching the side panels to the base, ensuring proper alignment․ Then, install the center support for added stability, followed by securing the top panel․
Attaching the Side Panels to the Base
Begin the standard configuration by carefully positioning the base panel on a protected surface to prevent scratches․ Align the left and right side panels with the pre-drilled holes on the base․
Using the provided screws – typically identified in the parts list – secure each side panel to the base․ Ensure the screws are tightened firmly, but avoid over-tightening, which could damage the particleboard․
It’s often helpful to have a second person assist in holding the panels in place during this step․ Double-check that the side panels are flush with the base before fully tightening all screws․
Pay attention to the orientation of the panels; some may have finished edges that should face outwards․ This initial step establishes the foundational structure of the TV stand, so accuracy is key․
Installing the Center Support
With the side panels secured to the base, proceed to install the center support․ This component adds crucial stability to the TV stand, particularly for larger televisions․ Locate the center support panel and align it with the corresponding pre-drilled holes between the side panels․
Utilize the screws designated for the center support – refer to the parts list for correct identification․ Insert the screws through the side panels and into the edges of the center support․
Again, avoid over-tightening․ Ensure the center support is perfectly vertical and flush with the front edge of the base before fully securing it․ A level can be used to confirm vertical alignment․
This step reinforces the structural integrity of the stand, preparing it for the top panel and eventual television placement․
Securing the Top Panel
Now that the base and center support are firmly in place, carefully position the top panel onto the assembled structure․ Align the top panel’s edges with the side panels and the center support, ensuring a flush and even fit․
Locate the appropriate screws – typically longer than those used for the center support – and insert them through the pre-drilled holes in the top panel․ These screws will fasten the top panel to both the side panels and the center support․
Tighten the screws gradually and evenly, alternating between sides to distribute pressure․ Avoid over-tightening, which could damage the wood or strip the screw holes․
Double-check that the top panel is securely attached and level before proceeding․ This forms the primary surface for your television and any decorative items․
Attaching the Back Panel
With the top panel secured, it’s time to attach the back panel, providing stability and a finished look to your TV stand․ Carefully align the back panel with the rear edges of the assembled structure – side panels, base, and top panel․
The back panel is typically secured using small nails or screws․ Locate the pre-drilled holes or designated nailing points along the edges of the back panel and the frame of the TV stand․
Begin attaching the back panel, ensuring it remains square and flush with the frame․ Use a hammer or screwdriver, applying even pressure to avoid damaging the panel or the surrounding wood․
Continue securing the back panel along all edges, maintaining consistent spacing between fasteners․ This step significantly enhances the overall rigidity of the TV stand․
Specific Component Assembly
Focusing on key elements, this section details the spine assembly, upper spine removal for tabletop mode, and mounting bracket installation for optional wall mounting․
Spine Assembly – Detailed Instructions
Begin by carefully identifying the spine assembly components – typically labeled ‘D’ in the parts list․ Locate the pre-drilled holes on the side panels and the spine itself․ Align these holes precisely, ensuring a flush connection․
Using the provided bolts and washers, carefully secure the spine to both side panels․ Do not fully tighten the bolts at this stage; leave a slight amount of play for adjustments later․ Refer to the diagrams in the manual for correct bolt placement․
Once both sides are attached, gently square the assembly․ Now, fully tighten all bolts, ensuring a robust and stable connection․ Double-check that all fasteners are securely in place․ This spine forms the central structural support, so proper assembly is crucial for the TV stand’s overall stability․ Remember to keep the upper spine and fasteners safe if you plan to use the tabletop configuration later!
Upper Spine Removal for Tabletop Configuration
To transition to the tabletop console configuration, the upper spine section must be detached from the main spine assembly․ Locate the two bolts and washers securing the upper spine (labeled ‘D’ in the manual) to the rest of the structure․

Using the appropriate tool, carefully unscrew these bolts․ Retain both the bolts and the upper spine itself, as they may be needed if you decide to revert to a different configuration in the future․ Store these components in a safe place to prevent loss or damage․
Once the bolts are removed, the upper spine should lift away easily․ Ensure a clean separation without forcing it․ This removal creates a flat surface suitable for placing a television directly onto the console, transforming the unit into a sleek, modern tabletop display․ Remember to consult the manual’s diagrams for visual guidance․
Mounting Bracket Installation (Wall Mounting Option)
For wall mounting, these steps are exclusively for those intending to secure their television directly to the wall․ If you’ve already mounted your TV on the rotating frame or plan to place it on the console, disregard these instructions․ The process involves attaching a mounting bracket to the spine assembly․
Carefully review the included mounting hardware and ensure compatibility with your television’s VESA pattern․ Align the bracket with the pre-drilled holes on the spine, and securely fasten it using the appropriate screws․ Double-check the bracket’s stability before proceeding․
Remember, wall mounting requires professional assessment of your wall’s structure and appropriate anchors․ This guide provides instructions for bracket-to-spine attachment only; wall preparation is your responsibility․ Consult a qualified professional for safe and secure wall installation․

Troubleshooting & Common Issues
Addressing potential problems, this section offers solutions for wobbling, missing parts, and proper screw tightening, ensuring a stable and enjoyable TV stand experience․
Addressing Wobbling or Instability
If your Whalen TV stand exhibits wobbling, begin by re-tightening all screws and bolts, ensuring they are firmly secured but not over-tightened, as this can strip the threading․ Carefully inspect the base to confirm it’s resting on a level surface; utilize shims under the legs if necessary to compensate for uneven flooring․
Double-check the center support installation, verifying it’s correctly positioned and securely fastened․ For wall-mounted configurations, confirm the mounting bracket is flush against the wall and properly anchored․
If instability persists, examine the spine assembly for any loose connections․ A wobbly unit often indicates a foundational issue, so systematically review each component’s attachment․ Remember, some steps are easier with assistance, so don’t hesitate to ask for help!
Dealing with Missing or Damaged Parts
Should you discover missing or damaged parts upon unboxing your Whalen 3-in-1 TV stand, immediately cease assembly․ Contact Whalen’s customer support team – warranty information is provided in the documentation – and clearly detail the missing or damaged components․
Having your order number and the part’s identification code (found in the parts list) will expedite the process․ Do not attempt to substitute parts, as this could compromise the stand’s structural integrity․
Whalen typically offers replacement parts free of charge under warranty․ Before contacting support, double-check the packaging material; smaller parts are sometimes concealed within․ Patience is key, and a complete, undamaged stand is the ultimate goal!
Screw and Bolt Tightening Guidelines
Proper tightening of screws and bolts is crucial for the stability and longevity of your Whalen 3-in-1 TV stand․ Avoid over-tightening, as this can strip the screw holes or damage the particleboard․ Initially, tighten all fasteners loosely, then progressively tighten them in a criss-cross pattern․
This ensures even pressure distribution and prevents warping․ Use the provided tools – do not substitute with power tools, as they lack the necessary control․ Regularly check the tightness of all fasteners, especially after initial use, and re-tighten as needed․
Inspect screws for any signs of wear or damage; replace them if necessary․ Following these guidelines will guarantee a secure and reliable TV stand assembly․

Final Steps & Maintenance
Complete cable management and regular cleaning will maintain your Whalen TV stand’s appearance and functionality, ensuring years of reliable enjoyment and aesthetic appeal․
Cable Management Solutions
Effective cable management is crucial for a clean and organized entertainment setup with your Whalen 3-in-1 TV stand․ Utilize the pre-drilled holes located in the back panel to route cables neatly, minimizing visible clutter․ Consider using cable ties, sleeves, or wraps to bundle cords together for a more streamlined appearance․
Strategically position power strips and surge protectors within easy reach, yet concealed from view․ Avoid overcrowding cable pathways, as this can lead to signal interference or damage․ Regularly check and adjust cable arrangements as new devices are added or removed․
For wall-mounted configurations, carefully plan cable routing to maintain a tidy aesthetic․ Concealing cables within wall channels or using decorative cable covers can further enhance the overall look․ Prioritizing cable organization not only improves aesthetics but also enhances safety by reducing tripping hazards and protecting cables from damage․
Cleaning and Care Instructions
To maintain the appearance and longevity of your Whalen 3-in-1 TV stand, regular cleaning is recommended․ Use a soft, damp cloth to wipe down all surfaces, avoiding harsh chemicals or abrasive cleaners․ For stubborn stains, a mild soap solution can be used, followed by a thorough drying with a clean cloth․
Avoid placing hot items directly onto the surface, as this may cause damage․ Protect the stand from prolonged exposure to direct sunlight or extreme temperatures․ Periodically check and tighten all screws and bolts to ensure stability․ Dust regularly with a microfiber cloth to prevent buildup․
When cleaning glass components, use a glass cleaner specifically designed for furniture․ Avoid excessive moisture, as it can seep into the wood and cause warping․ Proper care will help preserve the beauty and functionality of your TV stand for years to come․
Warranty Information and Customer Support
Whalen Furniture provides a warranty against manufacturing defects in materials and workmanship for a specified period from the date of purchase․ Please retain your proof of purchase for warranty claims․ The warranty does not cover damage resulting from misuse, improper assembly, or normal wear and tear․
For warranty claims or customer support, please contact Whalen Furniture directly through their official website or customer service hotline․ Their website often features a comprehensive FAQ section and downloadable resources․ Be prepared to provide your model number and purchase date when contacting support․
Whalen aims to provide prompt and helpful assistance with any assembly issues or part replacements․ Detailed contact information, including email addresses and phone numbers, can be found on their website․ Ensure you have your assembly instructions readily available when seeking assistance․